Browse Events
Welcome to the Events section of the RU4M Backoffice. This is where you can see all the events that exist on the platform, search for specific events, filter them by different criteria, and manage them from the dashboard. This page will walk you through everything you need to know, step by step.
There are two main places where you interact with events:
- Events Table (Dashboard) — This is the admin view inside the dashboard where you can manage, edit, publish, unpublish, and delete events. Only administrators and event organizers can access this area.
- All Events Page — This is the public-facing page that you see right after logging in to app.ru4m.com. It shows all events you have access to, and it is where you can search and filter events.
Let us explore each one in detail.
Events Table (Dashboard)
The Events Table is located inside the admin dashboard. This is the place where you, as an administrator or event organizer, can see every event at a glance and perform actions on them such as editing, publishing, or deleting.
View the Events Table
When you open the Events section in the dashboard, you will see a table — a grid of rows and columns — that lists all of your events. Each row in the table represents one event, and each column shows a specific piece of information about that event.
The columns you will see are:
- Event Name — The name/title of the event (for example, "Tech Conference 2026")
- Date — The date when the event takes place
- Time — The time when the event starts
- Location — Where the event is being held (a city, venue name, or "Online")
- Sponsor — The sponsor associated with the event, if any
- Status — Whether the event is published (visible to everyone), unpublished (hidden), or in draft mode
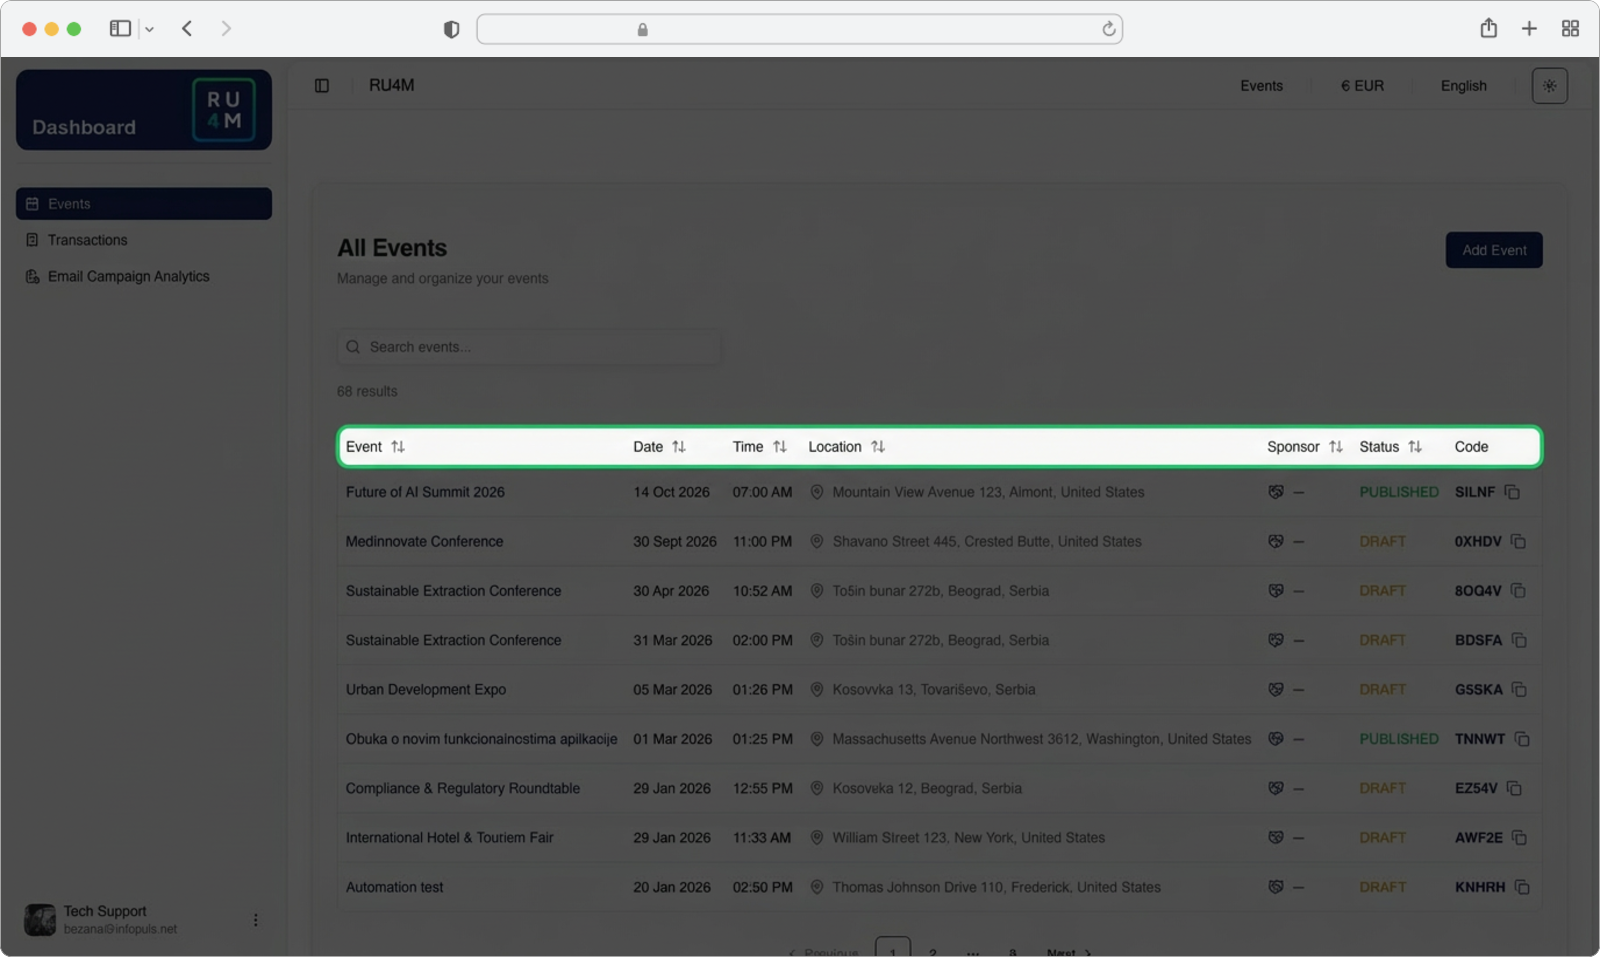
Sorting the table
You can sort the table by any column. To sort, simply click on the column header — that is the text at the very top of each column (for example, click on the word "Date" at the top). Clicking once will sort the events in ascending order (earliest first for dates, A-Z for names). Clicking the same header again will reverse the order (latest first, Z-A). This is very useful when you have many events and want to quickly find the most recent one or sort them alphabetically.
Invite codes for private events
If an event is set to private, it means only people who have a special invite code can join. In the Events Table, you can see the invite code for each private event directly in the table row. You can share this code with participants so they can enter it in the app to gain access to the event. Public events do not need an invite code — anyone can see and join them.
Open the Event Actions Menu
On the right side of each event row, you will see a small icon that looks like three vertical dots (sometimes called a "kebab menu" or "more options" button). This icon is located at the far-right end of the row.
Click on the three dots icon for the event you want to manage. A small dropdown menu will appear directly below the icon. This dropdown menu gives you several options for that specific event:
- Edit — Opens the event editor so you can change the event name, date, description, or any other detail
- Publish / Unpublish — Makes the event visible to everyone (publish) or hides it from public view (unpublish)
- Delete — Permanently removes the event from the platform
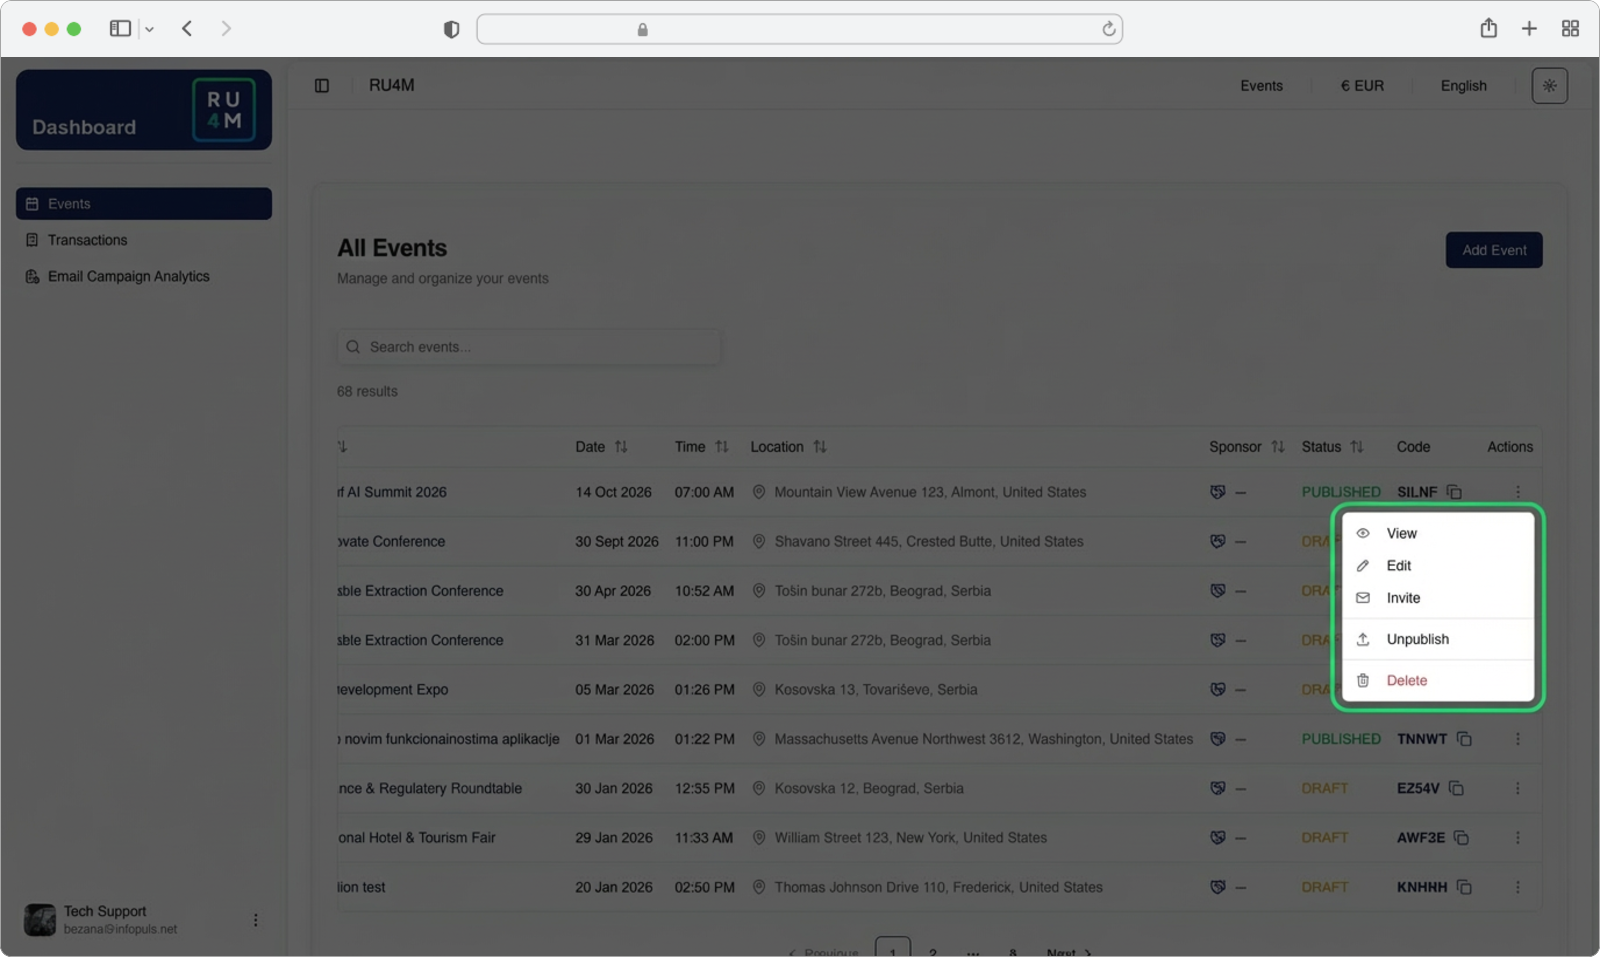
Deleting an event is permanent
When you click Delete, the event will be permanently removed. This action cannot be undone. All data associated with the event — including participants, tickets, and chat messages — will be lost. Make absolutely sure you want to delete the event before confirming. If you just want to hide the event temporarily, use Unpublish instead.
Edit vs. Unpublish
If you need to make changes to an event that is already live (published), you do not need to unpublish it first. You can click Edit and make your changes while the event remains visible to participants. However, if you want to make major changes and do not want participants to see the event in its incomplete state, you can Unpublish it first, make your edits, and then Publish it again when you are ready.
All Events Page
The All Events Page is the first thing you see after you sign in to app.ru4m.com. This is the public-facing page where all events are displayed as cards. From here, you can browse through events, search for a specific event by name, filter events by time or visibility, and change the language or visual theme of the page.
Let us go through each feature one by one.
Language Settings
The RU4M Backoffice supports multiple languages. You can switch the language of the entire page at any time. When you change the language, all the text on the page — buttons, labels, headings, and descriptions — will be displayed in the language you selected.
Find the language icon
Look at the top-right corner of the page. You will see a small icon that represents language switching — it may look like a globe or show the abbreviation of the current language (such as "EN" for English or "SR" for Serbian). This icon is located in the header bar at the very top of the screen, near the other setting icons.
Click on the language icon.
![]()
Select your language
After clicking the language icon, a dropdown menu will appear below it. This dropdown shows a list of all available languages.
Click on the language you want to use. The page will immediately refresh and all text will now appear in the language you selected.
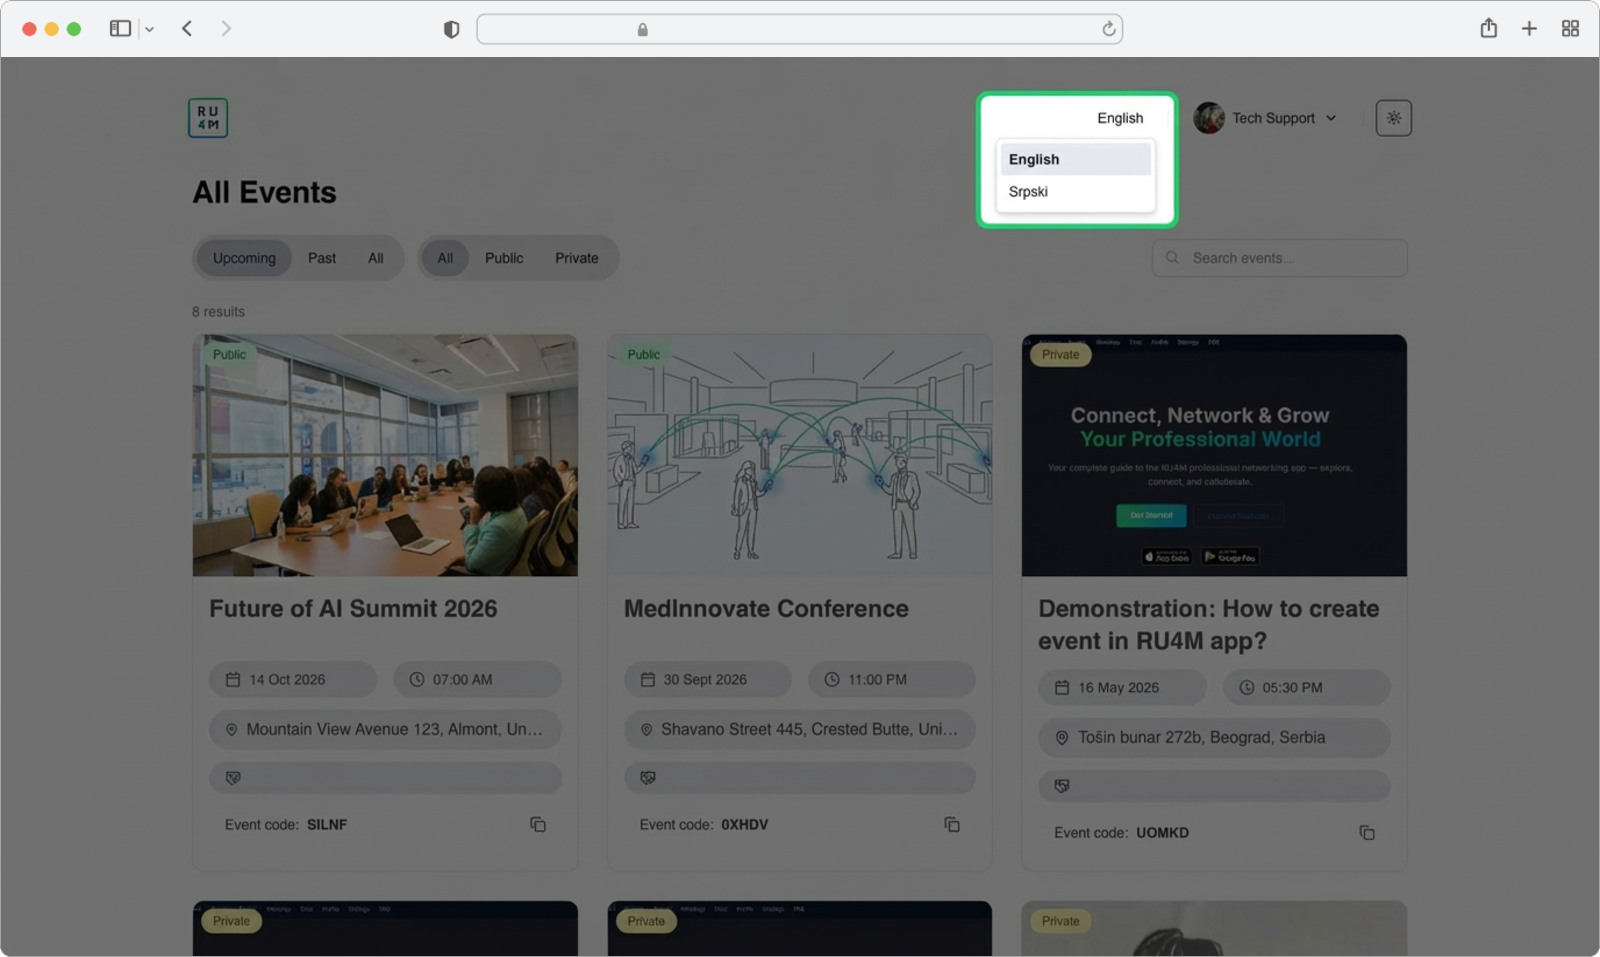
Language affects AI-generated content
This is very important: the language you select here is also used by the AI content generator. When you create a new event or set up an email campaign later, the AI will always generate text in the language that is currently selected on this page. For example, if you have Serbian selected, the AI will write event descriptions and email content in Serbian. If you want the AI to generate content in English, make sure to switch the language to English before you start creating or editing content.
You can change the language at any time
Switching languages does not affect your events or data in any way — it only changes the display language of the interface. You can switch back and forth as many times as you want without any consequences.
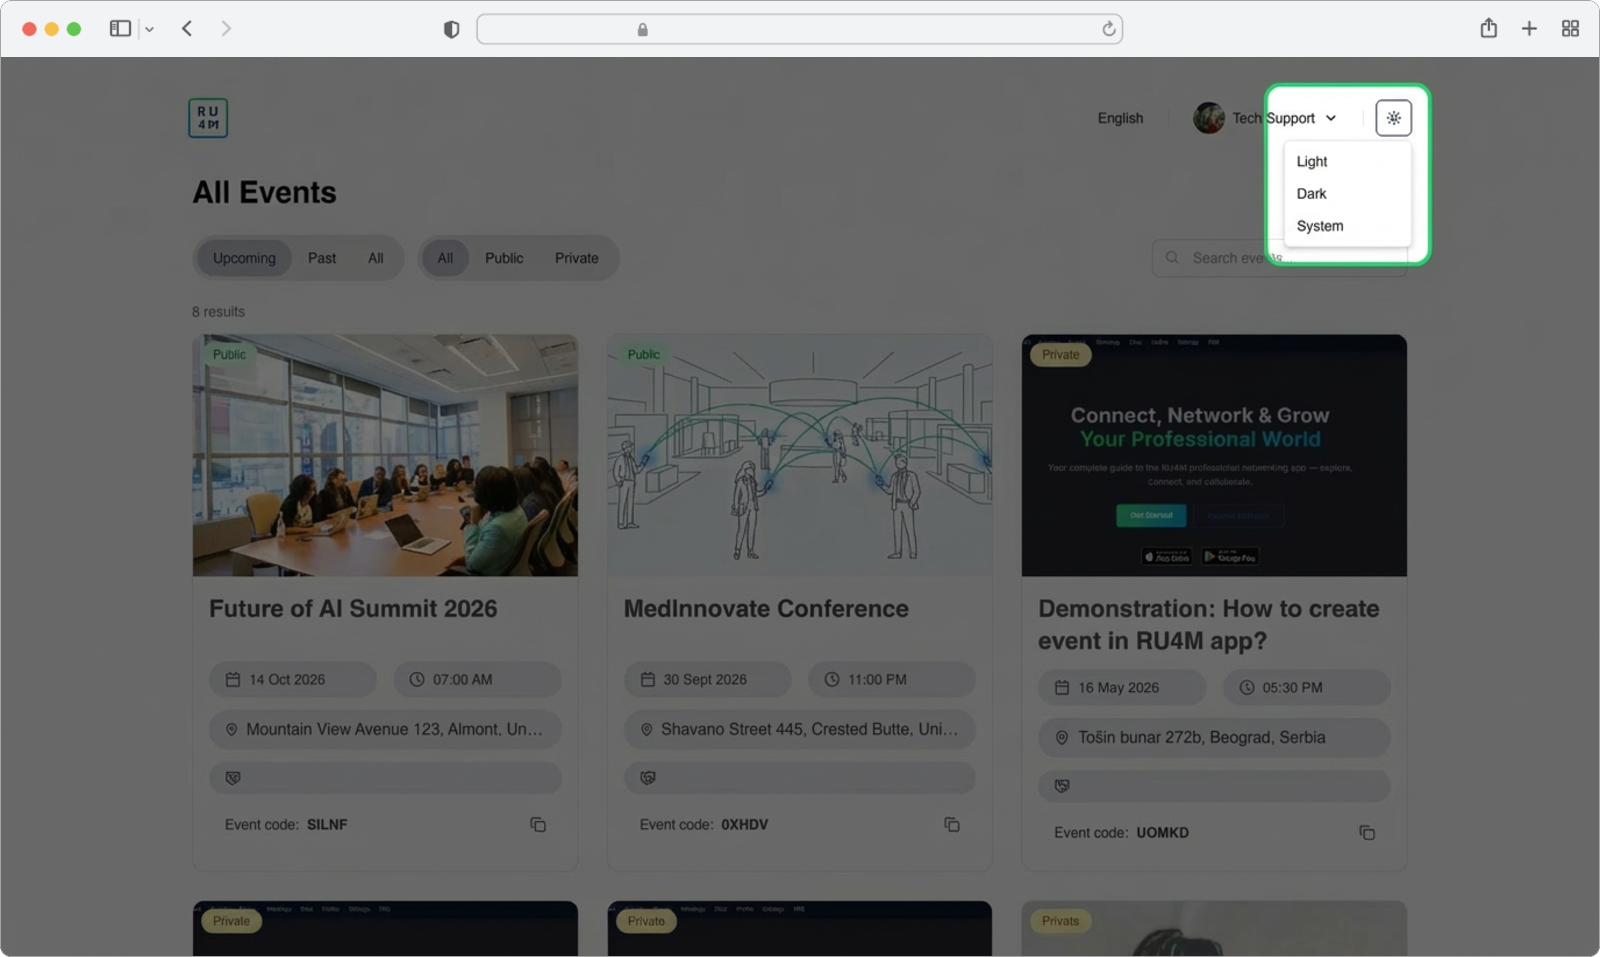
Theme Settings
The theme setting allows you to change the visual appearance of the page. You can choose between a light theme (white background with dark text), a dark theme (dark background with light text), or a system theme (which automatically matches whatever your computer is currently set to).
Find the theme icon
Look at the top-right corner of the page, in the same header bar where you found the language icon. You will see a small icon that looks like a sun. This is the theme toggle button.
Click on the sun icon.
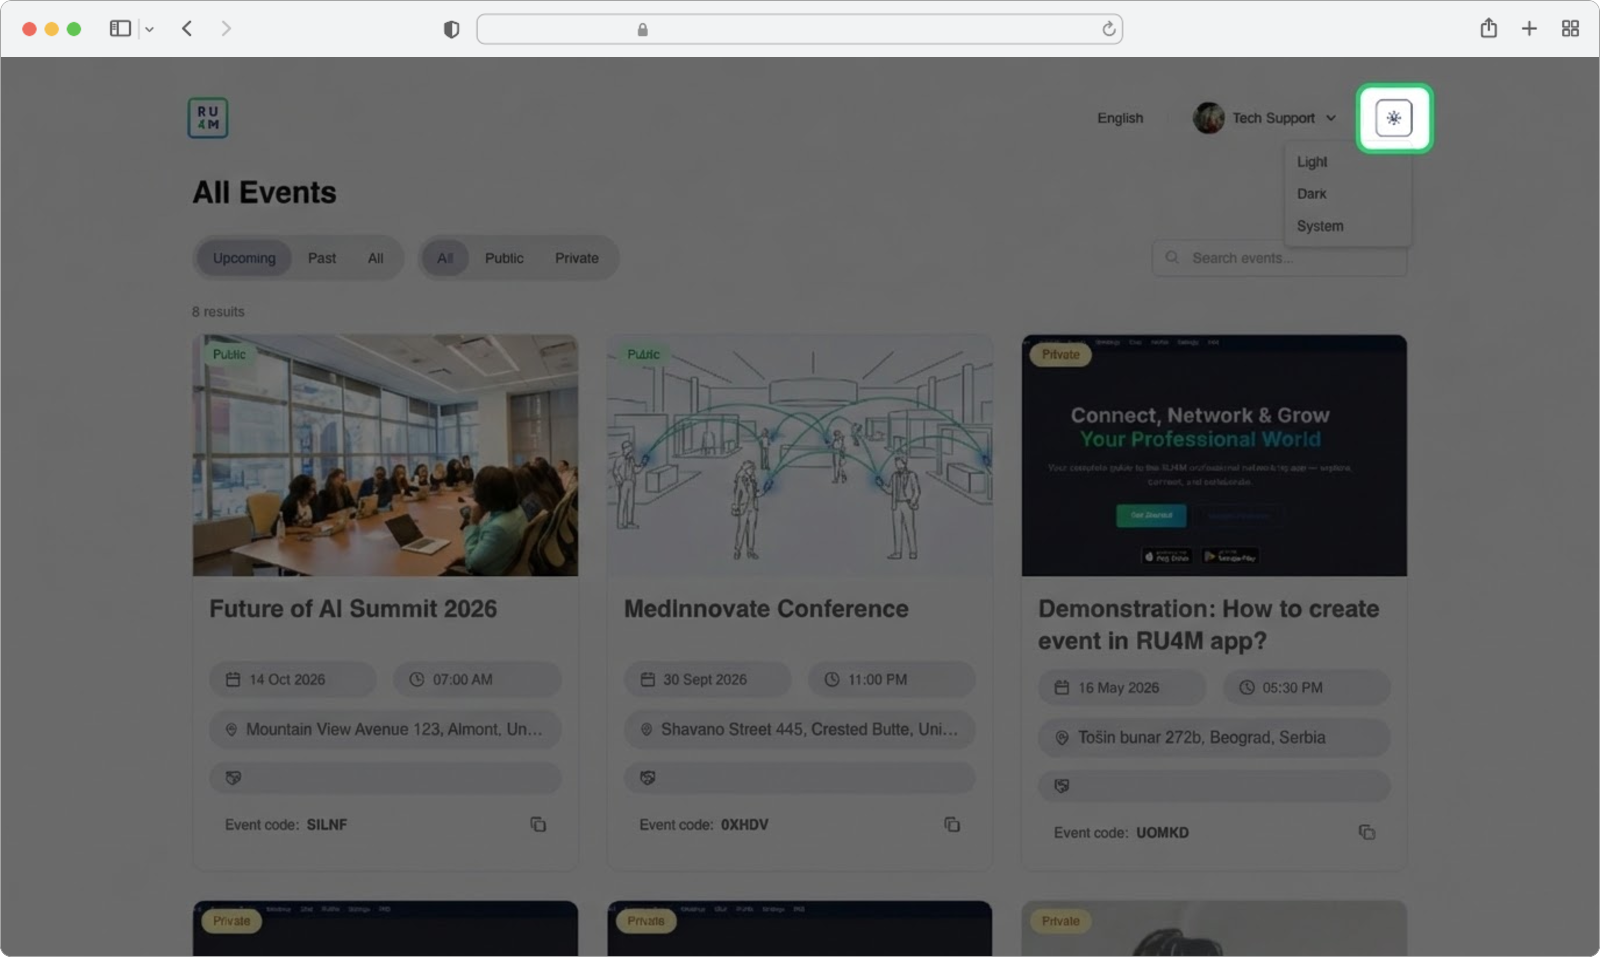
Choose your theme
After clicking the sun icon, a dropdown menu will appear with three options:
- Light — A bright, white background with dark text. This is the default and is best for well-lit environments.
- Dark — A dark background with light-colored text. This is easier on the eyes in low-light environments and can save battery on some screens.
- System — Automatically follows your computer's current theme setting. If your computer is set to dark mode, the page will use dark theme; if your computer is set to light mode, the page will use light theme.
Click on the option you prefer. The page will immediately change its appearance to match your selection.
Your theme preference is remembered
Once you select a theme, the platform will remember your choice. The next time you open the page, it will still be in the theme you selected — you do not need to change it every time you log in.
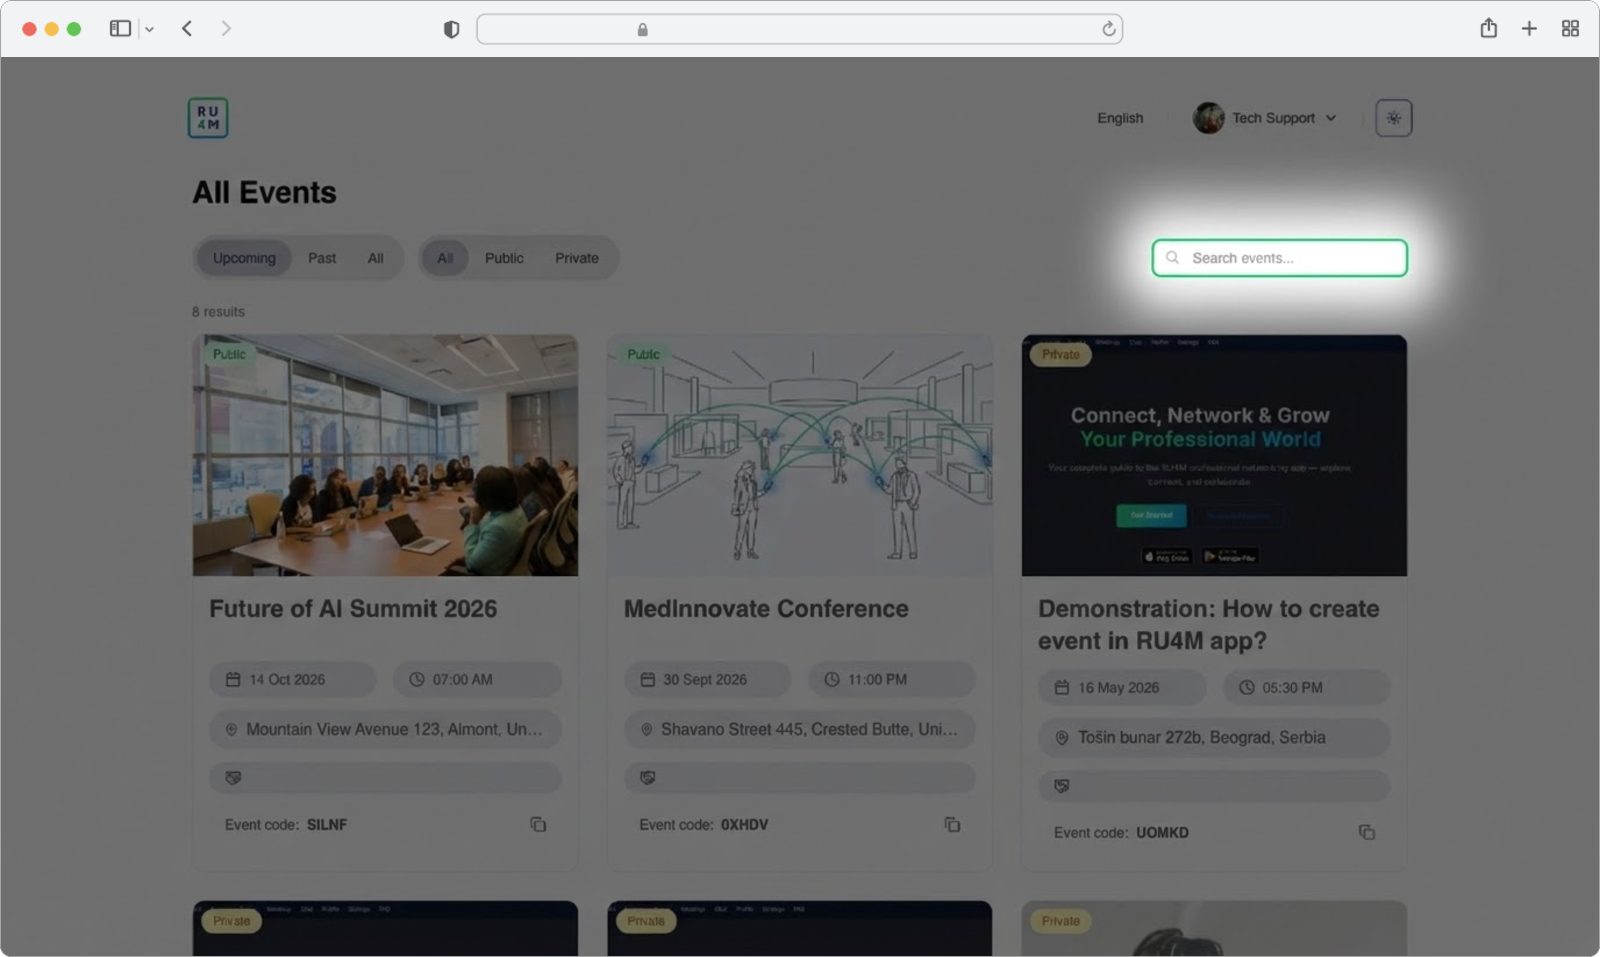
Search Events
If you are looking for a specific event and you know its name (or even just part of its name), you can use the search feature to quickly find it instead of scrolling through all the events on the page.
Find the search field
Near the top of the All Events page, you will see a text input field that says "Search events" (or similar placeholder text). This is the search bar. It is a rectangular box where you can type text.
Click on the search field. A blinking cursor will appear inside the field, indicating that it is ready for you to type.
Type your search term
Using your keyboard, type the name of the event you are looking for. You do not need to type the full name — even a few letters or a single word from the event name will work. For example, if you are looking for an event called "Tech Innovation Summit 2026", you could type just "tech" or "innovation" or "summit".
As you type, the list of events on the page will automatically update to show only the events that match what you have typed. You do not need to press Enter or click a search button — the results appear instantly as you type each letter.
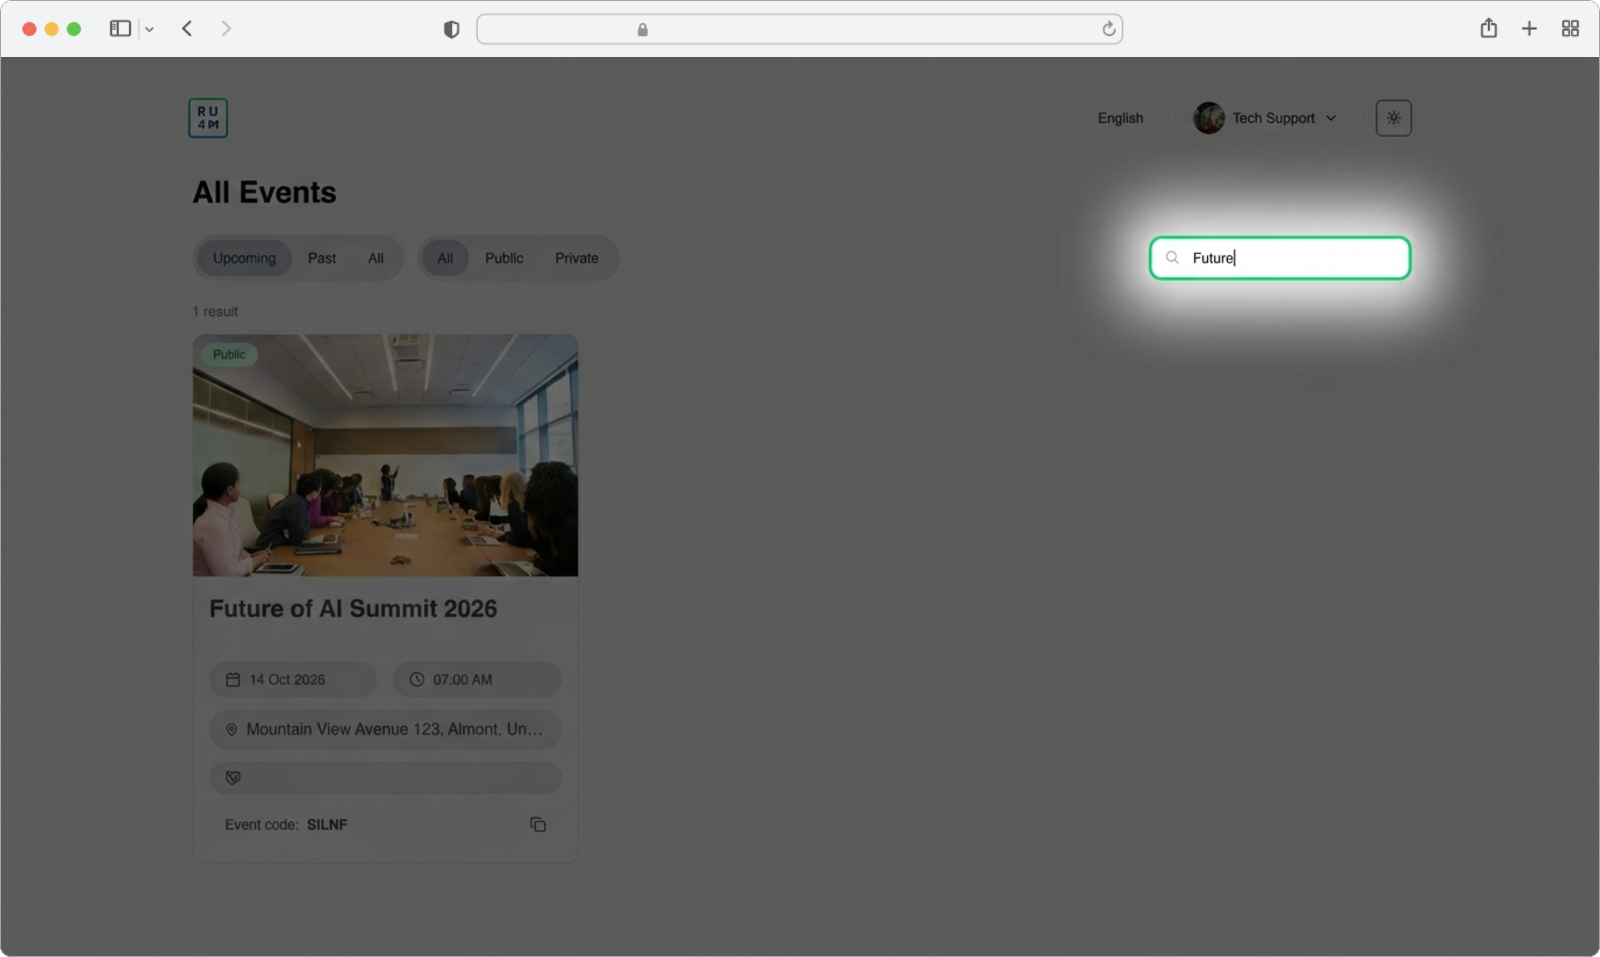
Clear your search to see all events again
To go back to seeing all events, simply delete all the text in the search field. You can do this by clicking inside the search field and pressing the Backspace key on your keyboard until all the text is gone, or by selecting all the text (press Ctrl+A on Windows or Cmd+A on Mac) and then pressing the Delete or Backspace key. Once the search field is empty, all events will be displayed again.
Search is not case-sensitive
It does not matter whether you type in uppercase (capital letters) or lowercase (small letters). Searching for "TECH", "tech", or "Tech" will all give you the same results.
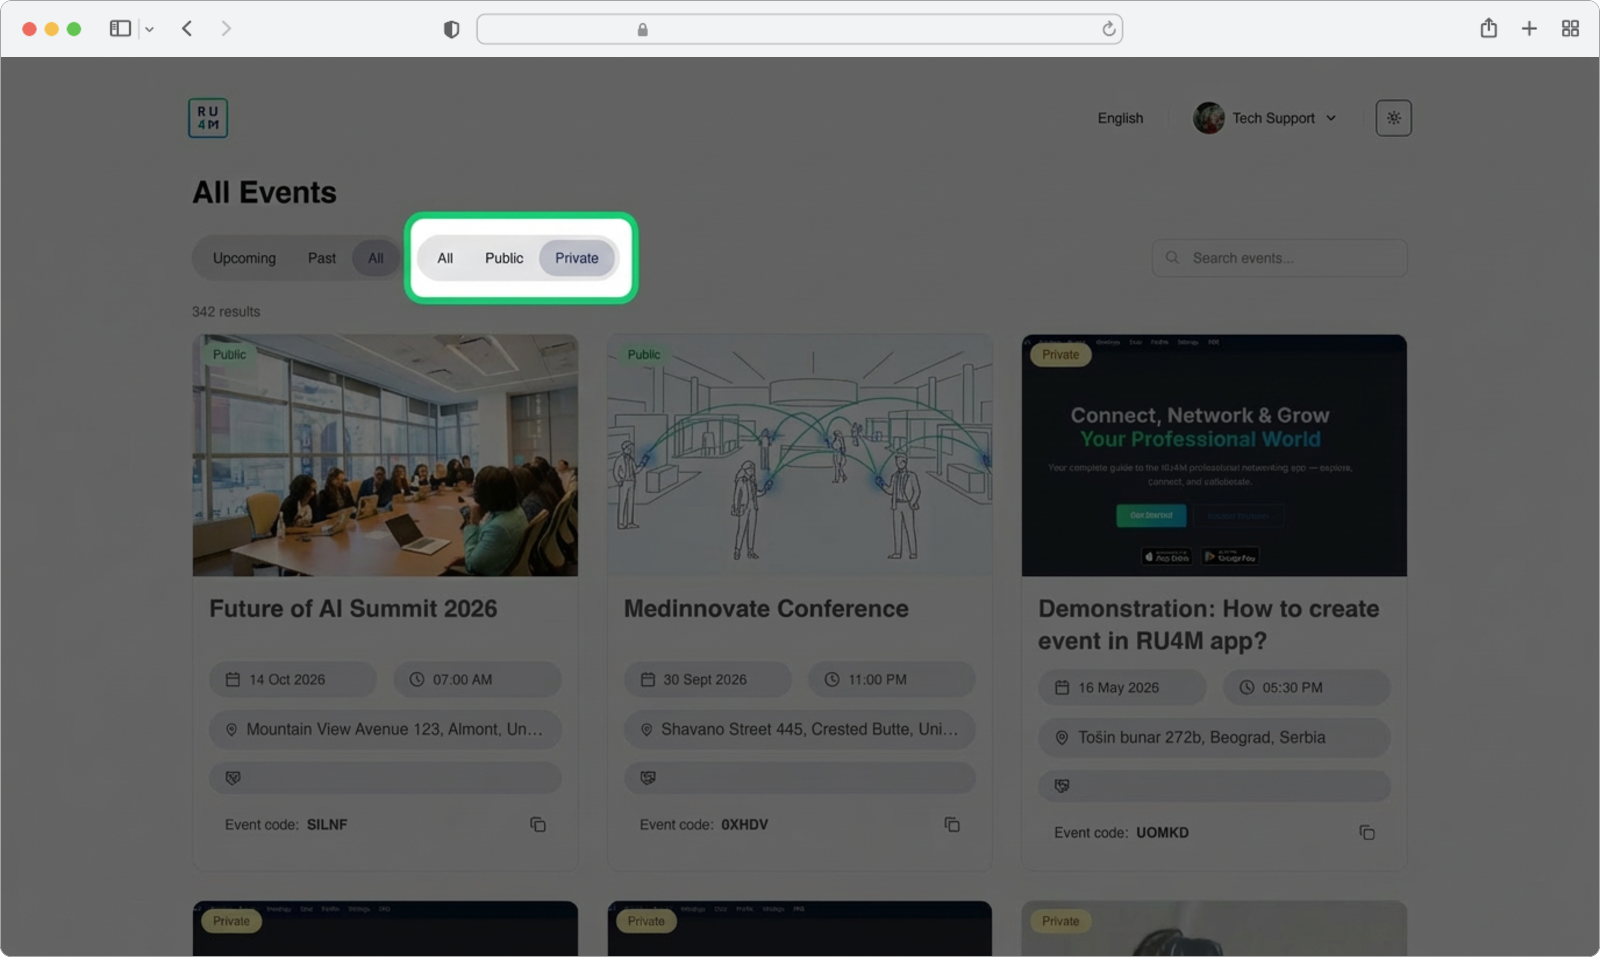
Filter Events
Filters allow you to narrow down the list of events based on specific criteria. This is helpful when you have many events and want to see only a certain category — for example, only events that have not happened yet, or only private events.
There are two types of filters available, and they are located near the top-left area of the events list, just above the event cards.
Filter by Time
The first filter lets you choose which events to display based on when they take place. You will see three clickable options arranged side by side:
- All — Shows every event, regardless of when it takes place. This includes events that have already happened, events happening today, and events in the future.
- Upcoming — Shows only events that have not happened yet. These are events scheduled for today or a future date. Past events are hidden.
- Past — Shows only events that have already finished. These are events whose date has already passed. Upcoming events are hidden.
Click on the option you want. The selected option will become highlighted (usually with a different color or underline) to show that it is active, and the event list below will immediately update to show only the matching events.
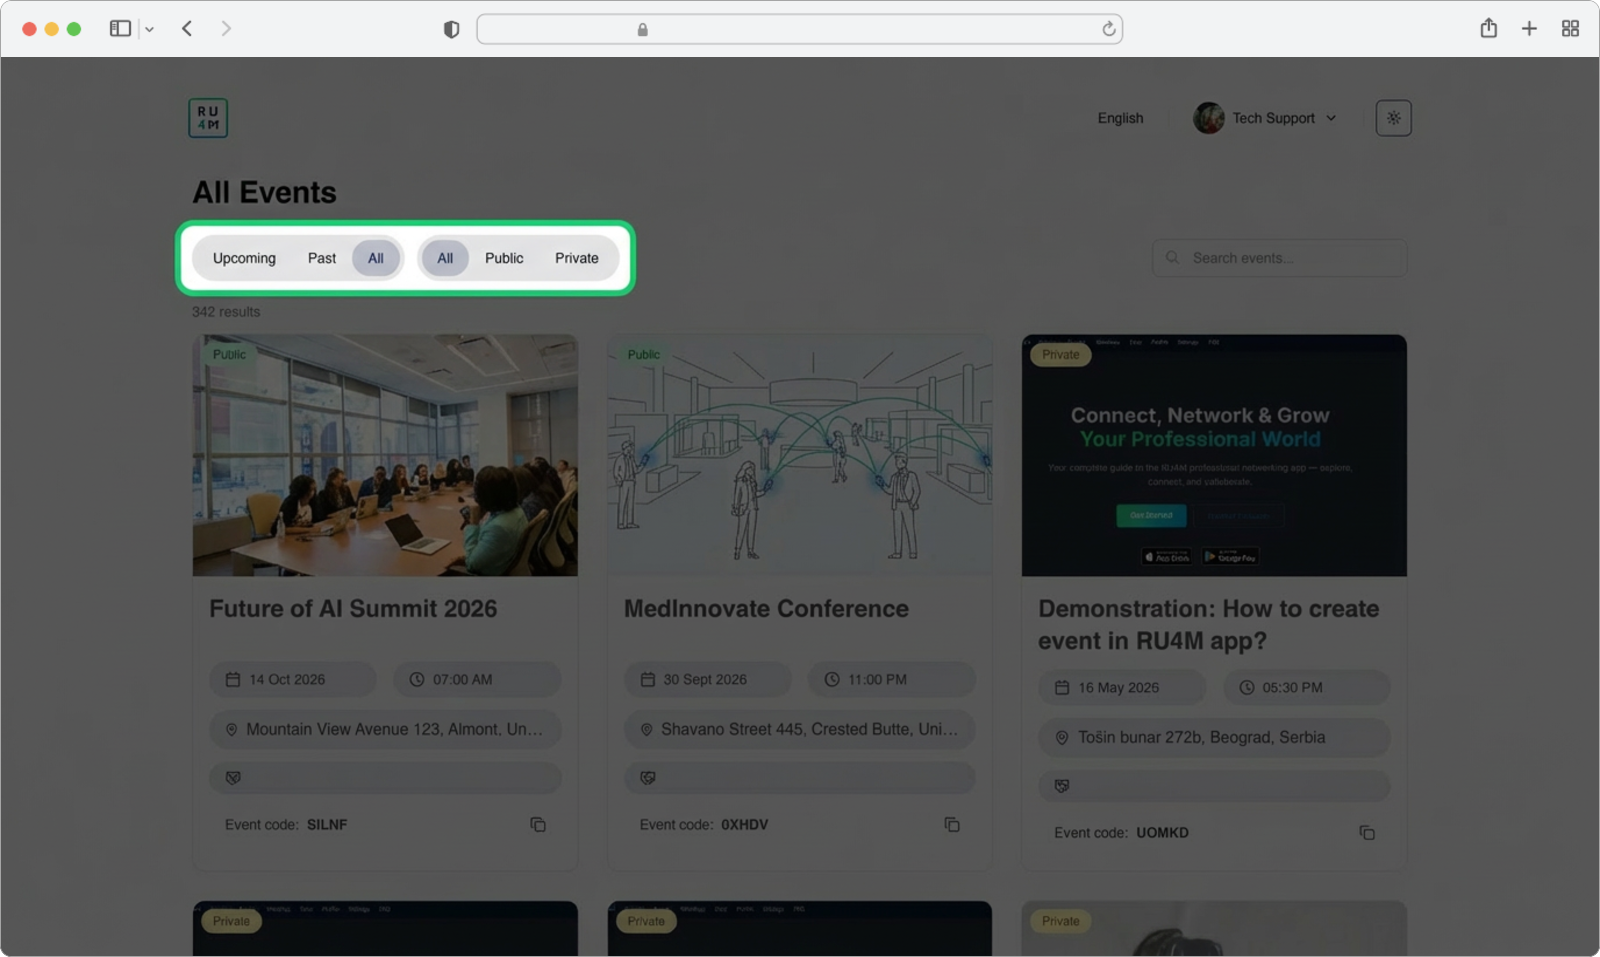
Combining filters
You can use the time filter and the visibility filter (explained below) at the same time. For example, you can select "Upcoming" and "Private" to see only private events that have not happened yet. The filters work together to narrow down your results.
Filter by Visibility
The second filter lets you choose which events to display based on whether they are public or private. You will see three clickable options:
- All — Shows every event, regardless of whether it is public or private.
- Public — Shows only public events. Public events are visible to everyone on the platform and anyone can join them without needing an invite code.
- Private — Shows only private events. Private events are visible only to people who have the invite code or who have been specifically invited by the organizer.
Click on the option you want. The selected option will become highlighted, and the event list will immediately update to show only the matching events.
What is the difference between public and private events?
A public event is open to everyone. Anyone who visits the platform can see it, read its details, and join it. A private event is restricted — it does not appear in the public event list for people who are not invited. To join a private event, a participant needs a special invite code that the event organizer provides. As an organizer, you can find this invite code in the Events Table in the dashboard (see the section above).
Resetting filters
To go back to seeing all events without any filters, simply click "All" on both filter rows. This will remove any active filters and display the complete list of events.